A while back I wrote about the SR20 that had the oil pick-up that broke off. Well, that engine was from an S13 belonging to Tanaka Racing. It was originally built as a drift car competing in D1 and Formula D. Now, the owner wants to build it as a track car, but after a couple of track events, the oil pick-up broke off, and that's where the fun ended for Jake Tanaka. . .

Mr. Wakita was the one who tuned the car originally, so Jake and his team decided to bring the car to us. The build order was simple and to the point: build a motor that was bulletproof.

Something that won't end up like this.
The valve train was unscathed, so we were able to reuse the cams, valve springs, cam gears, etc, but the rest of the motor was toast. We started with a motor that was known to be good and bored it 0.5mm over. We installed a set of CP pistons and the aluminum rods that we had custom built. (See previous post on aluminum rods)

These are what they look like compared to the stock rods
And here’s a pic of the shortblock all installed.

As for the head, it originally had an unported head with a complete Tomei valve train. We've ported the head, but keeping the valvetrain the way it was.

Nice and pretty
The only difference between the new and old head is going to be the ports and the valve timing. Here’s the SR20 getting the timing adjusted.


Below is the completed motor

The motor's all put together, and now all that's left is to put the motor in. But not until we clean up all the hoses and wiring.
Here's the water bypass that we made for this SR. On a stock SR20, there are a LOT more hoses that are underneath the intake manifold. This way, there's only lines that bypass the thermostat and go to the IAC valve for more stable idle. All the hoses for heater, throttlebody, etc, etc, have been removed.
And here's the motor installed into the car. I really wish that we had a before and after pic of this car.

Before we installed the motor, we drilled out all of the stock brackets that were not being used, and we repainted the front half of the engine bay. All the brackets that were still needed were remade using aluminum.
As I mentioned, the wiring was redone. In fact, most of the engine harness was completely uncovered; all of the connectors not being used were deleted, and redone.

The car is now completed. With the aluminum rods, forged CP pistons, and the Exedy Twin plate, the car literally revs like a motorcycle. The car is insane. Every car guy should be able to experience this in a lifetime. Very very responsive.
I can't wait to take this car to the dyno.
BTW, the turbo is a HKS GT-RS connected with a custom 3mm thick turbo manifold. This is the type of car that won't get much love by the internet warriors, but it’s the best type of race motor--Responsive, powerful, and bulletproof


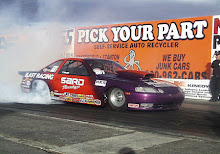
 It got a MCR front bumper, Z-tune fenders, side skirts, a GIANT SARD GT wing, and some Volks.

 Here’s the old inlet
 And here’s the new one
 This is why it wouldn’t have fit.

 You can clearly see daylight through the manifold... but wait, there's more!

 As you can see in this picture, the revisions designed to stiffen up this manifold didn't quite hold up. I just couldn't keep the day light out and the exhaust in.

 I'll have more pics of the making of the downpipe and what-not as soon as we get to it.


 And here are the rear.