Showing posts with label Fabrication. Show all posts

Sunday, August 31, 2008

Tanaka Racing S13

The S13 we introduced a couple days ago is complete. From last post, we've fabricated mounts for the radiator fans, oil catch can, coolant reservoir, and a whole lot of other little stuff to clean up the engine bay.
Here's a close up of the coolant reservoir

We also made the mounting brackets for the radiator itself.
The car was dyno'd this past week where it made 420hp at 1.2 bar. There's definately more power to be had with a boost controller that's operational, but the goal was a reliable 400hp, so our job is done.

Sunday, August 24, 2008

Guess What This Is Going To Be?

The final touches are being done on this part. We'll see how it turns out.

Sunday, August 17, 2008

Oil Temp and Pressure Sensors

Have you ever bought an aftermarket gauge and struggled trying to figure out where to put the sensor? The problem with these sensors is that all the wires can clutter the engine bay. So here’s what we did…


This is on the silver R32 drag car that we’re working on.

More on the Honda Radiator

Sorry I haven’t been posting lately, we’ve been really busy. The good news is that I have a whole lot of pics to post up here in the next couple of days.

First in order is the rest of that Honda radiator. With the K20 in the Integra, the radiator designed for the B18 doesn’t quite fit. So we cut the inlet of the radiator and plugged the old inlet.
Here’s the old inlet
And here’s the new one
This is why it wouldn’t have fit.

Monday, August 4, 2008

3 Times a Charm

So I’ve posted a couple pics of the project Miata (or the engine) a while ago. That was the 1st manifold, I believe. Long story short, we’re on the third one.

Here are the three manifolds lined up all pretty like.

One thing I've noticed about people in this industry (myself included) is that many of us don't take our own advice. It might be with the frequency of oil changes, the amount of boost we run, or going cheap on a manifold... whatever. Maybe this is because the labor is free. (not really free, but there's no out of pocket expense) I don't know. But for whatever reason, most mechanics will try a part out on our own car that we'd tell a customer to NEVER under ANY circumstance even think about buying. Well this is what happens when people don’t take their own advice… Twice…

Here's the first manifold. It's a see through...

You can clearly see daylight through the manifold... but wait, there's more!

And another crack. This manifold lasted a little over two months before it gave out.
Here's the "upgraded" version of the last one. There were a couple of extra ribs and gussets that made this manifold a little more promising, but looks can be deceiving. This one lasted a whopping TWO WEEKS!

As you can see in this picture, the revisions designed to stiffen up this manifold didn't quite hold up. I just couldn't keep the day light out and the exhaust in.

After all this, the owner of the car, Take of Tamacy Tuned, deciced to finally take his own advice and go with a cast manifold. He found one on ebay with a T3 flange.

We searched the shop for a turbo that would work, but we came out empty handed. Since 200hp was the goal of the car and we had a SR20 red top turbo laying around the shop, we decided to weld a T25 flange on the manifold and call it a day.

I'll have more pics of the making of the downpipe and what-not as soon as we get to it.

Welding Stuff

This is an Integra radiator. This guy's set-up worked pretty good for him, 'till he put a K20 in it. The K20 fits pretty good, but the radiator and the intake manifold didn't get along. About 1 inch from the intake manifold is the inlet of the radiator. So we chopped off the inlet and added one on the other side.

Here's the picture of the surgery.

Sunday, July 27, 2008

Taking the Slop Out of a R34 GT-t Steering.

For most people, there's nothing wrong with the steering feel of the R34 GT-t. That is until you get a chance to drive the R34 GTR. That's what happened to one of our customers. Actually, he's owned several GTRs before he got his hands on this GT-t, and he was not satisfied with the differences between the GTR and GT-t.

Many people think that, aside from the Engine and Drivetrain, the differences of these two cars are only skin deep. If that were true, the price difference between the two cars would be much less. I'm not going to get into the vast differences here, but here's a big difference.


Above is the steering rack taken out of the R34 GT-t


And here's a brand new steering rack from a BNR34.

As you can see, the mounting is very different between the two models. That's part of the reason why the steering feel is so different. This, of course, means it's not a bolt-on type of modification. So here's what we did...

And from a different angle...
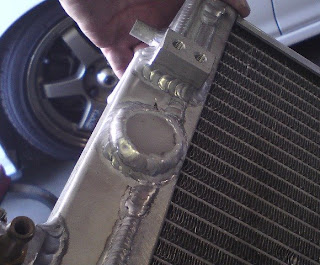
It's not just the mounting that's different. Since the whole subframe design is entirely different between the two models, so are the lines. Instead of fabricating lines from scratch, we opted to use/modify the GTR and GT-t lines. A little time on the lathe and a little brazing later, it was all done.
Here's the midified rack and lines installed.

Unfortuantely, we won't find out how well this combo will work untill we get the car running. Still more work to be done...

Monday, July 21, 2008

Evo Catch Can

I'm pretty sure the few readers of this blog are tired of hearing more about oil catch cans, but this is kind of a progress report for the customer, so here it goes...

Here it is being assembled...

Here's what it looks like installed

And here's the picture of the engine bay

Tuesday, July 8, 2008

Trunk Bar

The S15 SpecR and the R34 GTR have a trunk bar. . . Why didn't Nissan put this on all their cars? I don't know. But we're not going to let what Nissan did or didn't do stop us from making their cars better.


Above is the trunk bar we made for the S15. We'll be making them for the S14, S15, R33, and R34 (GTR & GTS), but if anyone's interested in one for their car, we can make them for just about any car


Here's the trunk bar installed on a S15. I'll be posting more pics as we exand our line-up.

Wednesday, July 2, 2008

Fender Brace for S15

There are a lot of fender braces available for the Silvia chassis. I've found prices range from $60-300 for your average ebay special to your name brand brace. Some people aren't satisfied with your average name brand piece. Most of these production pieces have ease (cost) of production and ease of bolting on as their main concern that the function has taken backseat. Here's our version:


Instead of a strip of metal with nuts welded on the back, we welded a nut onto a piece of metal that we welded directly onto the body.


We'll be making several of these for S15 fender braces, so we made a jig.


Here's a completed one on the jig.

James' Oil Catch Can

Here's another Catch Can that we made. It's for a Civic. Yes, we work on Hondas, too. We pretty much work on anything with, or sometimes without, wheels.


Anyway, here's the mock-up with some fiber reinforced adhesive strips (aka: ducktape/duct tape, whatever)


Here's a close-up view of the divider.


This is what it looked like right before we welded it shut.


And the final product installed in James' race car... I was going to wait until the valve cover was installed and AN lines were done, but I didn't feel like waiting til next Christmas to post these pictures.

Friday, June 27, 2008

240SX Engine Mount


I guess a picture is worth a thousand words. They are solid aluminum engine mounts for a 240SX.

Wednesday, June 18, 2008

The Green & Purple S13

I’m sorry I haven’t been updating regularly. My laptop & I were not on speaking terms for a while. It decided go on strike. But it works now, so business as usual.

Today, we have a green and purple S13 (for those of you who missed the title). It came in for a base map and dyno tuning, so we can’t take credit for the fabrication work, but there are a lot little things on it that we thought were cool. Like the placement of the intercooler. To this day, I can’t figure out why people put their intercooler and oil cooler in harms way. Hit one cone and you’re out. The initial expense is definitely more, and you can’t beat the efficiency and the look of a front mount intercooler, but even cheap intercoolers get can get expensive when you keep having to replace it every time you hit a cone or a curb.

Here’s the set-up from a different view. Notice the extremely short charge piping. That can’t be bad for spool-up.

Another clever custom piece. For those not up to date on the roll cage rules for formula D, the cage can’t go through the firewall to connect to the front shock towers. I believe there are other events that don’t allow that type of cage, so here’s the way around it:


I don’t know how effective it is compared to a ‘cage that fully ties everything together, but it’s definitely got to be better than nothing. It doesn’t seem like it’d be too hard to install, either. Painting after being welded in is the only hindrance I can think of. (it doesn’t look like it’d be fun to replace the windshield wiper motor either)

Friday, June 6, 2008

Way too much time on our hands

The other day, we really needed to use the pressure washer. We have/had 3 of them; two electric ones that only work intermittently and a gas powered one that we hardly use (it’s not everyday you need a 6HP pressure washer). Long story short, both of the electric ones decided to quit on us at the same time, and we really needed to use one of them, so we broke out the gas powered one.


But it’s never that easy, is it? We soon found out that the years were not too kind to the weathered pressure washer—mainly the gas tank. It was bursting at the seams, and gas was leaking everywhere.


I can’t explain why we wasted a good part of the afternoon making a gas tank for a pressure washer. “We were slow that day” just doesn’t quite seem to cut it. I’m not sure you can see the details in this picture, but the corners were rolled to give it that it’s-not-just-an-aluminum-box look, and the filler cap up top is from a KA24E that graciously donated its valve cover to science and/or madness, whichever you want to look at it. Yes, this gas filler hole used to be an oil fill hole on a valve cover that we chopped up and welded onto our new creation.


We're branching out from an automotive performance shop to a general performance shop. I guess we could start doing motor swaps on riding lawnmowers…